Posts

Installing Reflective Striping to make your Boston Whaler more Visible

Installing reflective striping along the top edge of your Boston Whaler will make you and your boat much more visible to marine traffic. Also, when being trailered the tape makes you visible to automobile and truck traffic. Imagine having your beautiful little Whaler parked in a lot and having someone turn the corner and head right for your boat and trailer. A simple strip of reflective tape would make your rig visible to even the most distracted driver.

There are several choices for tape. The least expensive and most versatile is going to be a flexible engineer grade. It comes in the most colors and is perfect for marine applications since it is only one layer and will not delaminate. A 1 or 2 inch roll is all you need.  This material is very flexible and easy to get to conform to curves.  It feels the same as what electrical tape would feel like.  Only very bright and reflective.

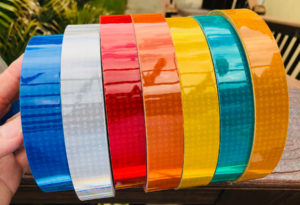
A second and even brighter choice would be a V82 Oralite tape.  It is going to be about 8 times brighter than engineer grade.  Since it will not stretch it would need to be applied to a flat, smooth surface.  V82 is just like a SOLAS tape but in colors.

Both of these tapes are a single layer design and will not delaminate making them perfect for marine environments.

– Installing a New Rub Rail / Bumper Rail on a Boston Whaler 13 15 17 Retro Fit

Installing a new rub rail or bumper on a Boston Whaler is not really that difficult.  If you have an older model then a new rub rail will update the boat as well as provide more protection than the smaller original rail.  If you are restoring a boat then you will of course want to replace the rub rail especially if the existing one is old or damaged.

We purchased our rub rail material from Jamestown Distributors.  We bought the largest that would fit on the rail of the boat.  The rub rail consists of two parts.  A main piece that goes on first, and a tube of the same type material that fits into the first piece.  The idea is that the main piece goes on and you glue and screw it in place and then the tube goes in and covers up the screws and provides additional protection.  Once you get the kit you will immediately see how it works.

Installing the main piece was very easy.  It helps to have two people so that one can pull the rub rail around the boat while the other applies 3m 5100 caulk to the boat and then screws in the piece.  Use plenty of 3m 5100 but not so much as to have it ooze out the edges when you put your screws in.

As you can see from the picture above the process is simple.  Just caulk and screw until you reach the other side.  By the way, make sure you have premeasured to that when you get to the other side you have more than you need and not less.

Having someone pull the material around is helpful.  Especially on the curves.  I used extra 3m 5100 and more screws on the corners and front of the boat.  If the rail rubs the ground it will get scratched up but don’t worry about it.  It cleans back up and is going to get scratched anyway. 

I spaced my screws about 6 inches apart.  Make sure to use plenty.  They should obviously be stainless.  Since you caulk first the screw goes through the caulk before going into the boat thus forming a seal.

Once you reach the end just cut off what you don’t need and finish screwing.  Now you are ready for the fun part.  Putting in the round portion of the rub rail.  I tried several methods and finally found one that worked.  It involved a hammer and a helper.  Keep in mind that the rub rail material is tough and strong.  Also, the round portion fits very tightly into the main piece.  I found that the secret to getting it into place is to get the tubing started and then have someone stretch the tubing while I hammer it into place.

Like I mentioned before, this part takes a little time a patience and a hammer but if you stretch the tubing at the same time you hammer it becomes much easier.  Soapy water helps a little.

Work your way around.  When you get to the end you can cut off what you don’t need.  Make sure to let the tubing pull back some since you stretched it.  Then just cap the ends and you are done.

– Boston Whaler 13 Sport Outboard Motor Tiller Handle Extension / Extender Review

If you install a tiller steer outboard motor on your 13 foot Boston Whaler Sport, the first thing you are going to notice is that the tiller handle is too short.  You have to reach way back to steer.  You can move the rear seat back some but then there will be no room for a battery or gas tank. I solved this problem on my boat by installing a tiller extender.  A tiller handle extender is a simple device that is actually made for electric motors but will work on outboards as well.  (Note – this works great for me but it is up to you to determine whether this is a safe option for your motor) I purchased mine through amazon.com and received it in just a few days.  I paid about $30.  It was the Minn Kota brand.  I recommend that you get the shortest one that you can.  A long extender is going to be in your way and will bend too much.  I would think the shorter the extender the safer it would be.

To install the outboard motor tiller extender you simply loosen the nut and slide it onto your tiller and then tighten it.  Make sure to push it as far on as it will go. That is basically it.

If you look at the picture of my engine below you will notice a little red handle that slides side to side.  This is made to increase and decrease friction so that your engine stays in one position while running.  I have found that it works best to have this loose when running slow and tight when running fast.  I keep mine tight at high speeds so that if the extender came off or broke the engine would not fly to one side or the other and flip the boat or throw me out.  Just a precaution.  Also, I recommend you clip yourself in to the engine so that if something does happen it will cut off.  

I have a picture at the bottom of this page of an extender that I made my self using a PVC pipe and a hose clamp.  The one I made is not pretty but is actually more substantial and safer than the one I purchased.  I keep it on the boat as a spare.


– Boston Whaler 13 15 17 Bimini Top Installation and Review

A bimini top accomplishes a variety of goals. First, it keeps you out of the sun and reduces your chances of sun burn.  Second, it keeps you cool in the shade.  Third, it keeps you out of the rain.  For long days on the water it is a must have item.  After we restored my 1967 Boston Whaler Sport 13 the first thing I ordered was the Bimini Top.  I purchased mine from www.specialtymarine.com .  They carry everything for the Boston Whaler and I felt like I would get the best fit buying a top made for my model boat.  The cost was $389.00.  The model I purchased fits the Boston Whaler 13, 15 and 17 foot models.

It took me approximately an hour and a half to install.  I had to figure out where all the poles went together and then had to screw the fittings on.  The instructions are good and all the parts I needed were included.  Once I had the canvas on the frame I measured the boat width and pulled the two arms of the top together so that the width of the boat and the width of the brackets would match.  After a few tries I got a match.  If you don’t bend the arms and match the width of the boat the top will always be pulling against the brackets from side to side.

I then positioned the bimini where I wanted it to go and marked the position of the main brackets. You should be able to keep the back and middle seat covered if the bimini is positioned right.  I kept the brackets as close to the outside edge as possible because I wanted to drill all the way through and use washers on the ends of the bolts.  (If you just screw into the thin fiberglass with a wood type screw the brackets will work their way loose and the top will eventually come off.)  I drilled through, filled the hole with 3m 5200, pushed the screws through the brackets and the holes and then put a washer and nut on the bottom side.  After the top was mounted I positioned the strap brackets and did the same.  The rear brackets are mounted to the transom so on those I was able to get a strong hold using stainless wood type screws.  Again, every hole was first filled with the 3m 5200.  After everything was tightened up I was done.  There are some stainless arms that can be used along with the straps but I did not really need the extra strength.  My boat only goes about 20 mph. 

I have to say that I am very pleased with the quality of the top.  Everything is stainless.  The fabric is a nice marine canvas with a vinyl backing to make it waterproof.  It is not as thick as I thought it would be but it is fine.  I have a spray dodger and sail cover on my sailboat and that material is thicker.

Note – When you install the top make sure to tighten up all the allen screws.  They are the ones that hold the stainless tube in the brackets.  If you don’t tighten them the top will jump out of the bracket in rough seas.  Also, keep the right size allen wrench on board just in case.


– Replacement Seat Cushions for your 13 foot Boston Whaler Sport

Once I had my 13 foot Boston Whaler Sport refinished, painted and had installed the seats I wanted to put some cushions in so I was not sitting on bare wood.  The site www.specialtymarine.com has a complete set for $295.  I also bought my new mahogany seats and my bimini top there.

The cushions are a perfect fit and come with straps that velcro the cushions to the seats.  The front cushion has a velcro strap that attaches it to the little eyelet in the front of the boat.  It also has snaps at the back that you can use to hold it down.  You will need to install the male part of the snaps on the boat to make these work.  You can just lay it up front but it may have a tendency to blow back in heavy seas.

The cushions are rugged and good quality, however, if you want them to last a long time and look new you need to pull them off the boat and put them in a dock box when they are not in use.  That is unless your boat is stored out of the weather and sun.  I have a habit of buying something nice and then leaving it out in the weather until it is ruined.  I don’t recommend this.

The cushions are available in two colors.  It took about a week for me to receive them.  I have to say that I am very pleased with them.  They certainly make a bouncy boat ride more tolerable.

– Boston Whaler Tohatsu 20 HP Outboard with Sport 200 300 Hydro Foil Review

The Boston Whaler and the outboard motor have been an almost perfect match since the inception of the boat.  This is mainly due to the wide stern and seaworthy hull design.  You get a safe feeling in a Whaler that you don’t get with other designs.  When your kids go out in a Whaler you don’t worry quite as much. There are, however, some issues that if corrected would make the boat even safer and more enjoyable.  Especially in heavy seas. These issues center around the outboard motor.

An outboard sits at the very back of a boat which is where the operator, fuel supply and battery are as well.  This creates a boat that is back heavy.  On longer boats this is not as much of an issue but on 13 and 15 footers it is.

One of the issues with a short boat that is back heavy is the tendency of the bow to rise excessively during planing.  In heavy seas this can create an uncomfortable situation for the operator. When running into the wind it feels like you will flip over backwards.  Also, when slowing down the boat tends to want to come off of a plane quicker and the bow goes back up.  In heavy seas you often want to slow the boat down but not to the point where you come off of a plane.

Another issue for boats that are underpowered is the time it takes to get onto a plane.  In some situations the motor is not able to do this at all.  For example, a 13 foot Boston Whaler with a 9.9 horse engine will barely get onto a plane if at all.

Short boats in heavy seas tend to get tossed around quite a bit.  On longer boats in excess of 17 feet this is not as noticeable. Although this cannot be eliminated, it can be reduced.

I installed an SE 200 Hydro Foil on my 13 foot Boston Whaler Sport and noted the following improvements –

  • The foils provided lift and keep the bow of my boat down during planing.
  • They also make my boat plane much quicker.  The bow stays down. (It is my understanding that on a 13 foot whaler with a 9.9 hp motor you can get onto a plane with a foil installed.)
  • The boat remains on a plane at much lower speeds which is great in rough seas. This is probably the best feature.  When it gets rough I have a wide range of speeds that I can choose from.  Before, I only had full speed and idle because when I slowed a little the bow would rise and the boat would get tossed around.
  • The fins seem to stabilize the boat as well.  This is also true when we tow it provided the motor is left down. The effect is similar to a gyroscope.
  • The SE Hydro Foil seems to reduce cavitation.

There are several fins available and they all work in generally the same way.  Some provide more lift than others.  Some are two piece and some are one piece.

I have a video at the following link that show my boat planing.  You will notice that the bow stays almost level the entire time. Boston Whaler 13 with Tohatsu 20 Horsepower and Hyrofoil Planing

It is my opinion that the foils or stabilizers work best on smaller boats.  The reason is that larger boats simply do not have the same issues to correct.  Also, you will see where people claim it makes the boat go faster.  I have not seen a noticeable difference.  If anything it may knock a half a mile per hour off your speed.  It really depends on whether the stabilizer remains underwater at full speed.

Here is a list of stabilizers.

Sport Marine SE 200 Hydro Foil

Sport Marine SE 300 Hydro Foil

Davis DOEL Fin

Stingray Speed XP

Stingray Junior

Seasense Outboard Motor Foil


– Boston Whaler 13 Sport Planing Out with 20 HP Outboard

This is a video of my 13 foot Boston Whaler planing out.  It has a 2011 – 20 horsepower Tohatsu outboard with power tilt and electric start.  I added an SE Sport Hydro Foil to the engine which also helps in faster planing.  You will notice that the nose stays down while accelerating.  This is due to the Hydro Foil.  The Tohatsu motor  cost around $3,200 via the online outboards website.  A 20 horsepower is the largest engine that they will ship.  Larger engines have to be installed at their location.  This is the main reason I went with a 20 horse versus a little larger engine.  I am very pleased with the performance of the boat and would recommend this setup to anyone.  We have had 4 adults in the boat and were still able to plane quickly and run about 20 miles per hour.

The purpose of this video is to visibly show that a 20 horsepower motor will plane out a 13 foot Boston Whaler very easily.

– Used Boston Whaler Classic 17 Montauk For Sale

The 17 foot Boston Whaler Montauk is the next most popular Whaler after the 13 foot sport.  Its larger size makes it well suited for larger seas and more passengers and equipment.  It is unsinkable just like the 13 foot sport.

Finding a used Boston Whaler Classic 17 footer is fairly easy if you look in the right places.  We have compiled some links to the best sites for finding 17 foot Boston Whalers below.

Craigslist – this is by far the quickest way to find a 17 foot Montauk Whaler in your area.  You have two choices to find a whaler using this method.  You can either find a Boston Whaler 17 Montauk already listed or you can post a WANTED ad.  I found mine in one day doing the latter.  To search craigslist simple go to www.craigslist.org and choose your city or a city near you.  Then type Boston Whaler into the search box and hit enter.  You can also go to www.searchtempest.com and search all of craigslist at one time plus some other sites.  To place a wanted ad do the same thing but post an ad and choose the wanted section which is under the for sale heading.

Yacht World – this is a great site that has 17 foot Boston Whalers for sale all over the world.  Just go to www.yachtworld.com and use the search function.  You would want to type in Boston Whaler 17 or Boston Whaler Montauk to keep from getting too many results that included the other sizes.  You can then modify the search by price, country and region.

Boat Trader Online – this is a good place to find a variety of boats including classic 13, 15 and 17 foot Boston Whalers.  You can search using different criteria and can also limit the results to those near you.

Boats Dot Com – this site is a lot like the boat trader site.  I just type in boston whaler as the model and then under keywords type in 17 or 17 foot.  There are normally a few of the 17 footers on the site.

Continuous Wave Website – this is a website specifically created for the Boston Whaler. There is a great deal of general information on the Boston Whaler Boats.  There is also a discussion board available where people sell their boats or discuss the boat.  Use the site search function and type in “Boston Whaler 17 Montauk for sale” or something like that.

American Classifieds – this is an established classifieds site that also puts out the Thrifty Nickel Classifieds.  Searching for a 17 foot Boston Whaler Montauk is easy either by using keyword or by going to the boat section.

More Information about the Boston Whaler Classic 17 foot Montauk.

A 70 horsepower engine is the optimum size for the Boston Whaler 17 footer.  A 70 horsepower will propel the boat to about 39 miles per hour.   A 50 horse engine would be the minimum and would push you along at about 30 mph. With a hydrofoil installed on the motor it would get you onto a plane fairly quickly.  The largest engine that you could safely run would be around 100 horsepower.  The boat can handle larger but the extra power is unnecessary and will get you to a speed that is going to be a bit much for the boat.  Your top speed would be in excess of 50 miles per hour.  You should refer to the manufacturers recommendations before powering the boat.

I recommend a 4 stroke engine for fuel economy and dependability. 


– Fixing or Repairing Larger Holes in your Boats Hull

Repairing larger holes in your Boston Whaler hull can be a little more involved than small dings, however, the process is still relatively simple.

First you are going to sand or grind into the hole which is actually going to make it bigger.  Sand or grind away until the edges are clear and then sand all the way around the hole.  For a Boston Whaler you also want to create a void behind the hole.  To do this you can sand away or scrape away some of the foam so that the fiberglass is exposed inside and out.  The idea is to be able to fiberglass the inside and outside of the damaged area for maximum strength.  Before the next step you need to make sure the damaged area is very dry inside and out so that the epoxy will adhere.

I normally mix a batch of West Epoxy and then chop up some fiberglass cloth and mix that into the epoxy.  It makes sort of a mush.  It may not be pretty but it will make the repair strong.  After I mix and create a mushy mixture of epoxy and cloth I push it into the hole so that it presses against the back of the hole all the way around and basically fills in the hole.  You can use a stick or a screwdriver to push it into the void.  You want to fill the hole up with this mixture.  Then just let it set up.

After the epoxy mush sets up you should be left with a hole that is filled in but still very rough looking.  To smooth out the hole just take some epoxy, thicken it with colloidal silica and spread it into the hole until it is smooth.  Then you can cut some fiberglass cloth that is a little larger than the hole, mix epoxy, coat the hole and the surrounding area, lay the cloth on, coat it again and let it set up.

Then just sand the area smooth and paint it.  That’s all there is too creating a very strong fiberglass repair that is actually stronger than it was before it was damaged.


– Fixing or Repairing Small Dings and Holes in a Boat Hull

Repairing dings and holes in the hull of your Boston Whaler 13, 15, 17 or larger boat is not as difficult as you would think.  Especially if the hole has not caused any delamination between the hull and the foam.  The steps to fixing a simple ding or small hole are as follows.

First sand the area.  I use a disc sander.  You want to create a rough area around the hole or ding for epoxy to stick to.

Next you will fill the hole or ding with epoxy that has been thickened with colloidal silica.  This is simply a filler that you add to epoxy to give it more substance.  West Epoxy systems carry this.  I normally mix my epoxy and hardener together and then immediately stir in the colloidal silica.  You have about 15 minutes to use the epoxy so you need to get it thickened quickly.  Once mixed you simply take a bondo spreader and putty into and around the ding or small hole.  Spread it onto the roughened area around the ding as well.  Get it as smooth as you can.  Note – you can also use Marine-Tex.

Now you are going to take a vibrating sander and smooth out the area.  You can use a medium grit and then switch over to a finer grit.  If you need to you can mix some more epoxy and spread a thin coat to fill in any imperfections.  Then sand again until it is perfectly smooth.

After the area is smooth you just wipe it down with a solvent thinner and paint the area with a topside paint.

For larger holes see our article to the right.